
Description
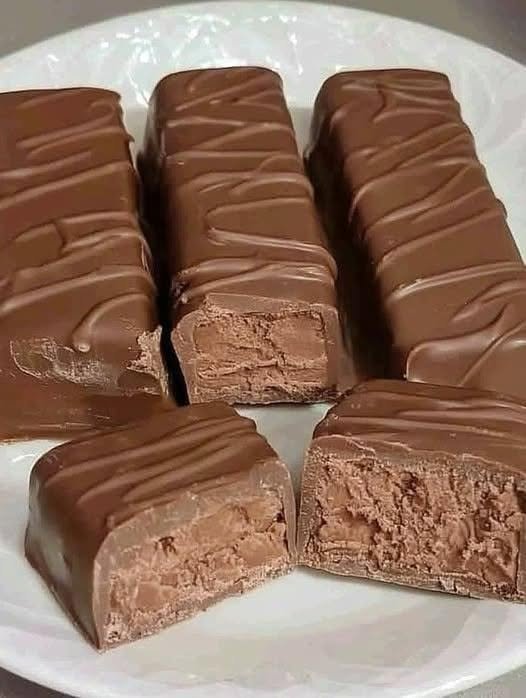
Homemade Keto Musketeer Candy brings the nostalgic taste of a classic chocolate nougat bar into your kitchen with a low-carb twist. Each bite features a light, fluffy chocolate center wrapped in a smooth, rich sugar-free chocolate coating. It’s a delicious option for chocolate lovers looking for a homemade keto dessert without the high sugar content of traditional candy bars.
This recipe uses sugar-free chocolate, a low-carb sweetener, and optional protein powder to create a satisfying treat that can fit into a high-protein eating plan. It’s easy to prepare, requires no complicated candy-making equipment, and makes a wonderful addition to your collection of keto-friendly desserts.
Short 3-Line Description
Enjoy fluffy chocolate nougat covered in a rich, sugar-free chocolate shell with this homemade keto candy recipe. Made with low-carb ingredients and optional protein powder, these bars offer a customizable alternative to traditional chocolate candy. Perfect for chocolate cravings, keto desserts, and make-ahead treats that you can store in the refrigerator or freezer.
Can This Homemade Keto Musketeer Candy Support Weight Loss Goals?
Yes, Homemade Keto Musketeer Candy can fit into a weight-management plan when portions and total daily calorie intake are considered.
- Portion control: Making individual candy bars helps you manage serving sizes and enjoy chocolate without automatically reaching for a larger packaged treat.
- Lower carbohydrate content: Using sugar-free chocolate and an appropriate low-carb sweetener can reduce the carbohydrates compared with conventional candy bars.
- Protein potential: Adding an appropriate protein powder can increase the protein content and make the recipe more suitable for protein-conscious eating.
- Fat and calorie awareness: Chocolate, cream, and nut-based ingredients can contribute substantial calories, so low-carb does not automatically mean low-calorie.
- Balanced nutrition: Enjoying a candy bar alongside a balanced diet that includes protein-rich foods, vegetables, and other nutrient-dense ingredients can help support your overall goals.
Weight loss depends on your overall eating pattern and energy balance, not on a single dessert.
Does This Recipe Fit a High-Protein Lifestyle?
Homemade Keto Musketeer Candy can fit into a high-protein lifestyle when prepared with a suitable protein powder and low-carb ingredients. Its net carbs can be relatively low when sugar-free chocolate and a suitable sweetener are used, although the exact amount depends on the brands and quantities. The chocolate coating contributes most of the fat, while protein powder can increase the protein content of the fluffy center. Traditional nougat-style candy is not naturally high in protein, so this homemade version benefits from carefully selected ingredients. Treat it as a protein-enhanced dessert rather than a primary protein source, and check the nutrition labels to confirm the final protein and net-carb values.
Why This Recipe Is Special
- Keto-friendly sweetness: Sugar-free chocolate and a low-carb sweetener help reduce added sugar.
- Fluffy chocolate center: The soft, airy filling recreates the enjoyable texture of classic chocolate nougat.
- Customizable protein content: Optional protein powder can boost protein without requiring a completely different dessert.
- No complicated candy-making: The recipe uses simple melting, mixing, chilling, and coating techniques.
- Make-ahead convenience: Prepare several bars at once and keep them chilled for a quick chocolate treat.
My Personal Experience
– The fluffy center makes the candy special. A properly whipped filling creates a light texture that contrasts beautifully with the chocolate shell. Adding protein powder gradually helps prevent the center from becoming too dense or chalky.
– Sugar-free chocolate gives a satisfying finish. A good-quality sugar-free chocolate creates a rich coating that complements the sweet nougat-style filling. Melting it gently helps maintain a smooth, glossy appearance.
– Chilling makes shaping easier. Allowing the center to firm up makes it much easier to cut neat, evenly sized bars. A properly chilled filling also helps the chocolate coating set more cleanly.
– Small bars are ideal for portion control. Cutting the mixture into individual pieces makes it easier to enjoy a sweet treat in moderation. Consistent sizes also make the estimated nutrition per serving more reliable.
These are recipe-specific preparation tips rather than claims of personal cooking experience.
Perfect For
- Afternoon snacks: Keep a chilled bar ready when you want something sweet with coffee or tea.
- Keto dessert plans: Enjoy a chocolate treat made with low-carb ingredients that suit your chosen carbohydrate target.
- Meal prep: Prepare a batch in advance and portion it into individual servings.
- Chocolate cravings: The combination of fluffy filling and a crisp chocolate shell provides a satisfying candy-style experience.
- Holiday dessert trays: Serve small homemade bars alongside other sugar-free desserts.
- Protein-conscious eating: Choose a suitable protein powder to make the filling more protein-rich than a conventional candy center.
Why You’ll Love This Recipe
– A classic candy-inspired flavor. The soft chocolate filling and smooth coating recreate the familiar appeal of a chocolate nougat bar. You can enjoy that nostalgic combination with ingredients tailored to a low-carb lifestyle.
– Easy to customize. Adjust the sweetener, chocolate intensity, and optional protein powder to suit your preferences. A little vanilla or espresso powder can deepen the chocolate flavor without adding much carbohydrate.
– Convenient make-ahead dessert. The bars can be prepared ahead and stored in the refrigerator until you want one. This makes them a practical choice for busy weekdays and planned desserts.
– A lower-sugar alternative. Sugar-free chocolate and a suitable sweetener can reduce the sugar content compared with traditional candy. Always check labels because some sugar-free products contain other carbohydrates or added fats.
– Protein-enhanced when desired. Protein powder provides a practical way to increase the protein in the filling. The amount should be balanced carefully so the nougat remains soft instead of dry or rubbery.
Common Mistakes to Avoid
- Overheating the chocolate: High heat can scorch chocolate or make it seize. Melt it over low heat or in short microwave intervals, stirring frequently.
- Adding too much protein powder: Excess protein powder can create a dry, chalky, or overly firm center. Add it gradually and adjust the moisture as needed.
- Skipping the chilling stage: A warm or soft filling is difficult to shape and coat. Chill it until firm enough to cut cleanly.
- Using the wrong sweetener: Some sugar substitutes produce a gritty texture or a cooling aftertaste. Choose a finely powdered or otherwise suitable sweetener for the filling.
Required Equipment
- Mixing bowls — Keep the filling and melted chocolate organized during preparation.
- Electric hand mixer or stand mixer — Whips the filling to a lighter texture when the recipe uses a whip-friendly base.
- Rubber spatula — Folds ingredients together without unnecessarily deflating an airy filling.
- Microwave-safe bowl or double boiler — Melts chocolate gently for a smoother coating.
- Small saucepan — Useful for warming cream or another liquid ingredient when needed.
- Parchment paper — Prevents the candy centers from sticking during chilling.
- Sharp knife — Cuts the chilled filling into neat, even bars.
- Fork or dipping tool — Helps coat the bars in chocolate while allowing excess coating to drip away.
- Refrigerator-safe tray or container — Keeps the candy level while the filling and coating set.
Storage Instructions
Refrigerator: Place the finished candy bars in an airtight container and refrigerate for approximately 5–7 days, provided the ingredients and handling support that storage period. If the recipe contains dairy or another perishable filling, keep the bars refrigerated and avoid leaving them at room temperature for extended periods.
Freezer: Arrange the bars in a single layer until firm, then transfer them to a freezer-safe airtight container with parchment paper between layers. They can generally be frozen for up to 2 months for good quality.
Thawing: Thaw frozen bars in the refrigerator for several hours or overnight. This helps reduce condensation on the chocolate coating.
Maintaining protein quality: Refrigeration and freezing generally preserve the protein in the recipe well, although they do not increase its protein content. Store the bars properly and discard any that develop an unusual smell, appearance, or texture.
Serving tip: Keep the candy chilled until shortly before serving, especially in warm weather, because the chocolate coating can soften quickly.
Recipe Details
- Preparation Time: 20 minutes
- Cooking Time: 5 minutes
- Chilling Time: 1–2 hours
- Total Time: Approximately 1 hour 25 minutes to 2 hours 25 minutes
- Servings: 12 small candy bars
- Best Season for This Recipe: All-season
- Total Calories per Serving: Approximately 150–190 calories per bar
These figures are estimates for a protein-enhanced, low-carb version. Actual nutrition depends on the specific chocolate, filling ingredients, sweetener, and protein powder used.
Ingredients
Makes approximately 12 small candy bars.
For the chocolate nougat-style center
- 1 cup (240 g) thick, unsweetened coconut cream, chilled
- 1/3 cup (35–40 g) powdered erythritol or another suitable powdered low-carb sweetener
- 1/4 cup (25–30 g) unsweetened cocoa powder
- 1/3 cup (30–35 g) unflavored or chocolate protein powder
- 1 tsp vanilla extract
- 1/8 tsp salt
For the chocolate coating
- 8 oz (225 g) sugar-free dark chocolate
- 1 tsp coconut oil, optional, for a smoother coating
Ingredient notes
- Coconut cream: Use thick coconut cream rather than thin coconut milk. Refrigerate it overnight and use the thick portion for the best consistency.
- Protein powder: Whey protein isolate or a suitable plant-based protein powder may work, but each absorbs liquid differently.
- Sweetener: Powdered sweetener helps avoid a gritty filling. Adjust sweetness according to the product’s intensity.
- Sugar-free chocolate: Choose a product whose carbohydrate and sugar-alcohol content fits your dietary preferences.
- Coconut oil: Optional; it can make the melted coating easier to dip but also makes it slightly softer at warmer temperatures.
- Allergen note: Depending on the ingredients, this recipe may contain coconut, dairy, soy, or other allergens.
Directions
Step 1: Prepare the filling ingredients
Measure the coconut cream, sweetener, cocoa powder, protein powder, vanilla, and salt.
If using refrigerated coconut cream, scoop out the thick portion and avoid adding excess watery liquid. This helps the filling become firm enough to shape.
Step 2: Mix the chocolate filling
In a mixing bowl, combine the thick coconut cream, powdered sweetener, cocoa powder, vanilla, and salt.
Beat with an electric mixer on medium speed for approximately 1–2 minutes, until the mixture looks smooth and evenly colored.
Add the protein powder gradually, mixing on low speed until incorporated. The filling should be thick, creamy, and spreadable rather than watery.
High-protein tip: Protein powder varies in absorbency. If the mixture becomes too thick, add unsweetened almond milk one teaspoon at a time. If it is too soft, chill it before deciding whether more dry ingredients are needed.
Step 3: Shape the nougat-style layer
Line a small rectangular container or tray with parchment paper.
Spread the filling into an even layer approximately 1/2–3/4 inch thick. Smooth the surface with a spatula so the bars will have consistent dimensions.
Cover and refrigerate for 45–60 minutes, or until firm enough to cut without smearing.
Step 4: Cut the bars
Lift the chilled filling out of the container using the parchment paper.
Place it on a cutting board and use a sharp knife to cut it into 12 evenly sized bars.
If the filling begins to soften, return it to the refrigerator for another 10–15 minutes before continuing.
Step 5: Melt the chocolate coating
Place the sugar-free dark chocolate and optional coconut oil in a microwave-safe bowl.
Microwave at medium power in 15–20-second intervals, stirring after each interval. Continue for approximately 1–2 minutes in total, depending on your microwave.
Alternatively, melt the chocolate over a double boiler on low heat, ensuring that no water enters the chocolate.
Stop heating when the chocolate is mostly melted, then stir until smooth. It should be fluid enough for dipping but not hot enough to melt the chilled centers.
Step 6: Coat the candy bars
Remove the chilled bars from the refrigerator.
Dip each bar into the melted chocolate using a fork or dipping tool. Turn it carefully to cover all sides, then lift it out and let excess chocolate drip back into the bowl.
Place each coated bar on parchment paper. For a decorative finish, drizzle a little extra chocolate over the top before the coating sets.
Step 7: Chill until set
Refrigerate the coated bars for 15–25 minutes, or until the chocolate shell is firm.
The outside should feel set and smooth, while the center should remain soft and creamy rather than hard or crumbly.
Store the finished candy in an airtight container in the refrigerator until serving.
Nutrition Facts (Per Serving – Approximate)
Illustrative estimates for 1 of 12 bars. These figures must be recalculated using the exact brands and quantities of your ingredients.
| Nutrient | Approximate amount |
|---|---|
| Calories | 170 kcal |
| Total Fat | 13 g |
| Cholesterol | 5 mg |
| Sodium | 100 mg |
| Potassium | 180 mg |
| Total Carbohydrates | 10 g |
| Fiber | 4 g |
| Net Carbs | 3–5 g |
| Sugars | 1 g |
| Protein | 6 g |
| Calcium | 35 mg |
Important nutrition notes:
- Net carbohydrates are commonly estimated by subtracting fiber and, where appropriate, qualifying sugar alcohols from total carbohydrates.
- Sugar-free chocolate products vary significantly in carbohydrate content, so the actual net carbs may be higher or lower.
- Protein content depends on the protein powder and the amount used.
- The coconut cream and chocolate coating contribute most of the fat and calories.
- These values are not laboratory-tested nutrition facts; use ingredient labels or a reliable recipe calculator for a more accurate estimate.
Notes
- For a lighter center: Whip the filling thoroughly before adding the protein powder, provided your chosen coconut cream whips successfully.
- For a richer chocolate flavor: Use dark chocolate with a high cocoa percentage and add a small pinch of espresso powder to the filling.
- For a firmer bar: Chill the filling longer before cutting and dipping.
- For a smoother coating: Add a small amount of coconut oil to the melted chocolate, if desired.
- For protein adjustments: Increase protein powder cautiously, as excessive amounts can make the center dry and dense.
- For allergy safety: Check the labels on chocolate and protein powder for milk, soy, nuts, gluten cross-contact, and other allergens relevant to your household.
- For reheating: Reheating is unnecessary; serve the bars chilled or let them stand briefly at room temperature for a softer center.
- For sweetener sensitivity: Some sugar alcohols may cause digestive discomfort in larger quantities, so choose a sweetener that suits your preferences.
Frequently Asked Questions
1. Are Homemade Keto Musketeer Candy bars truly keto-friendly?
They can fit a ketogenic eating plan when prepared with low-carb ingredients and when the net carbohydrates per serving fit your individual daily target.
2. Can I make these candy bars without protein powder?
Yes, but the filling will contain less protein and may require a different balance of cocoa powder and coconut cream to achieve the desired consistency.
3. Why is my nougat-style filling too soft?
The filling may contain too much liquid, insufficient dry ingredients, or may simply need additional chilling time.
4. Can I use regular chocolate instead of sugar-free chocolate?
Yes, regular dark chocolate works, but it generally increases the sugar and carbohydrate content of the finished candy.
5. How do I keep the chocolate coating smooth?
Melt the chocolate gently, stir frequently, keep water away from it, and dip the bars only after the filling has become thoroughly chilled.
6. Can I prepare these candy bars ahead of time?
Yes, you can prepare them several days ahead and refrigerate them in an airtight container, or freeze them for longer storage.
Related Posts
High Protein & Low Carb Ground Beef Cottage Cheese Queso Skillet Dip
Description This High Protein Ground Beef Cottage Cheese Queso Skillet…
Easy Creamy Horseradish Sauce Recipe for Steak, Roast Beef & Low-Carb Meals
Description This Easy Creamy Horseradish Sauce is smooth, tangy, slightly…
High-Protein & Low-Carb Meatloaf – Juicy, Healthy & Easy Homemade Dinner
Introduction This High-Protein & Low-Carb Meatloaf is the perfect combination…